
Using TYPO3 for Small Projects Pt. 1

Introduction
We often talk about TYPO3 being the ideal enterprise CMS and enthuse about the fact it's trusted to power corporate websites, intranets and university portals across the globe.
However, as well as being the ideal choice for large enterprise projects, it might be worth considering TYPO3 for your next personal project, such as a micro site or personal blog.
In this two part guide I want to show how easy it is to install TYPO3 and use it for a personal blog. We will:
- Install TYPO3 on a $4 a month Digital Ocean Droplet
- Use SQLite for our installations database
- Once we’ve installed TYPO3, we’ll add our domain and take a tour of TYPO3’s backend
- In the second part of this guide, we’ll install and customise a simple theme for our site and install the TYPO3 blog extension.
Head over to part 2 to learn more about pages and content.
In part 3 we will look at how to install and configure the Blog Extension.
Keeping Costs Low - Micro Instances
We want to create a simple blog with an “about me” and "contact" page. We know that this isn’t going to be a high traffic site so we can provision our webserver accordingly.
In this example I’m going to use a Digital Ocean Droplet that is capped out at $4 a month. Other providers are also available including AWS and Google Cloud. All I need is a webserver running Apache or NGINX with PHP 8.2 or higher installed and command line access so that we can use Composer to install TYPO3 and then set up the database.
Introducing SQLite
TYPO3 has supported SQLite since version 9 back in 2017 and we'll use it for this project. This means we don't need to spin up a dedicated database (more costs) and we don't want the hassle of installing and configuring a database on our web server that will eat into our limited CPU and RAM - SQLite is perfect for this scenario.
SQLite does have some drawbacks, especially when it comes to concurrency, but for a small site with low traffic and only a single administrative user, it's very cost effective.
Make sure to check out Brian Douglas’s guide on tuning SQLite for web applications.
Pre installation checklist
- Composer 2 is installed
- PHP 8.2 or higher is installed
- Web server (Apache or NGINX) is installed and running
- SQLite version 3 is available (an easy way to check is by running the following command: sqlite3 --version)
- Shell access
- SSL is set up and configured for your sites domain
Installing TYPO3
From the root folder of your web directory, run the following command:
composer create-project typo3/cms-base-distribution blog "^13"
This will create a new directory called blog and will install the latest version of TYPO3 inside it.
Make sure to configure your webserver so that it serves from the public directory which will be found inside the newly created blog directory.
- /var/www/blog/
- /var/www/blog/public
If we access the servers domain or IP we can begin the installation process.
Step 1 - FIRST_INSTALL

The very first thing we’ll need to do is create an empty file called “FIRST_INSTALL” in the public directory.
In my example it would be:
/var/www/blog/public/FIRST_INSTALL
Next TYPO3 will scan our environment (our webserver) and check that it’s able to continue the installation process. If something is wrong it will be flagged here and you will have the opportunity to address the issue and rescan. The most common errors you’re likely to encounter here are related to missing PHP extensions that TYPO3 needs to run.
Step 2 - Connect To The Database
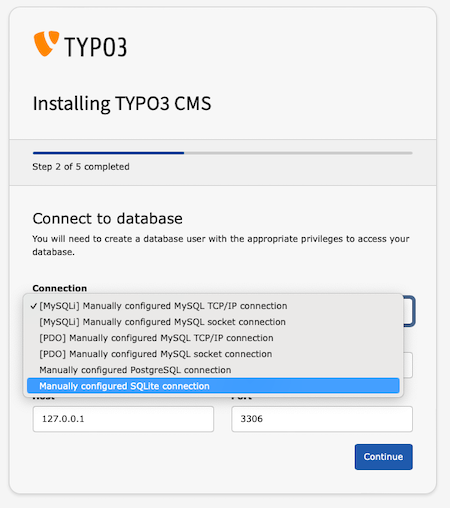
Next we need to set up the database for our TYPO3 installation. TYPO3 supports a number of RDMS including MySQL (including MariaDB), PostgreSQL and SQLite.
We’re going to use SQLite in this guide for the reasons mentioned earlier. From the drop-down, select “Manually configured SQLite connection”.
By selecting this option, TYPO3 will then create an SQLite database and place it in /blog/var/sqlite/
Step 3 - Create an Administrative User
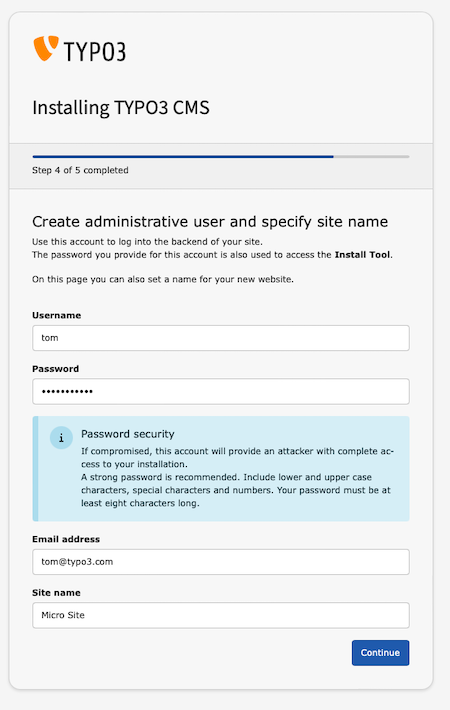
We now have to set up our administrative account so that we can access TYPO3’s backend.
Once the installation process is complete you will use this account to gain access to the backend.
Step 4 - Specify a Site Name
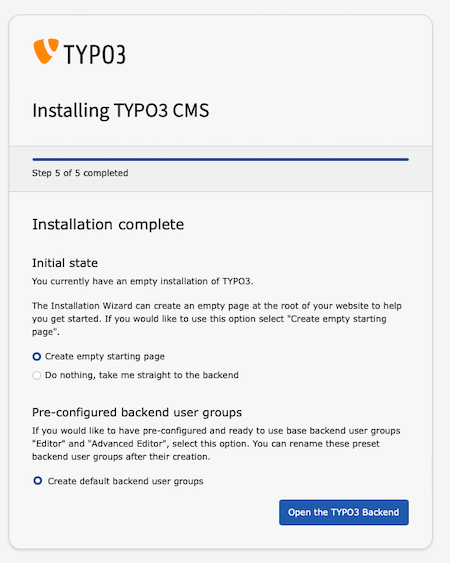
Before the installation process is completed, we have the option to create an empty starting page in our site and have TYPO3 create two backend user groups - Editor and Advanced Editor.
In my example I’m only going to select the first option and have TYPO3 create a default page for me.
You can find out more about Backend User Groups by visiting this link.
Logging In and Accessing the Backend
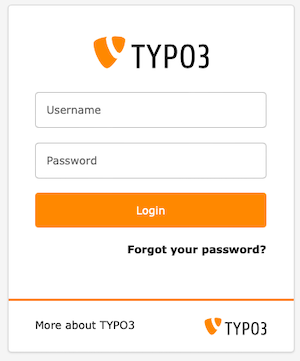
Once the installation process is complete, we will then be presented with the login form for the backend
The default entrypoint for any TYPO3 installation is /typo3. This can be changed to something more unique but by default it will always be www.my-site.example/typo3
Once we’ve logged in we'll be presented with TYPO3’s backend and the Dashboard module.
Don’t be too overwhelmed, we have full administrator access so every module within the CMS is visible to us.
Backend Modules: Page, FileList and Site Management
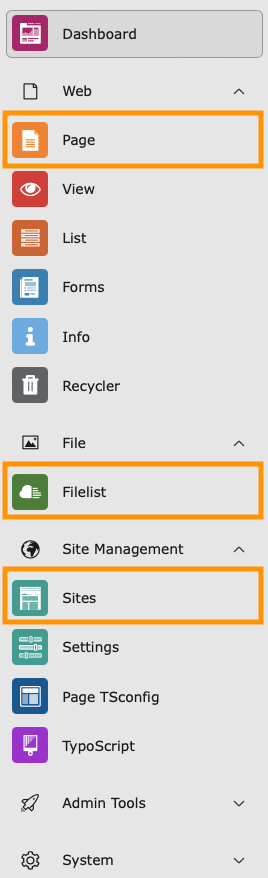
There are three modules on the left hand side that are important to us.
Page Module
From the Page module we will build out our page tree, starting adding pages and from here we will create and publish our blog posts.
Filelist Module
We use the Filelist Module to store and manage our assets; images, documents and files will be stored here.
Site Configuration (Sites)
Found with the Site Management module, here we can configure our TYPO3 installation. We can add our sites domain, specify the default language and load our extensions once we’ve installed them.
System Information and User Settings
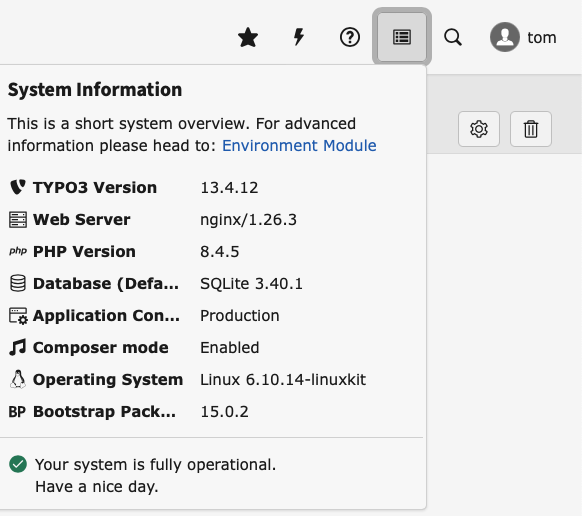
System Information
On the top right hand side we have the System Information panel, from here we can find out more information about our installation, including what version of TYPO3 we’re running. From here I can also verify that my installation is using SQLite.
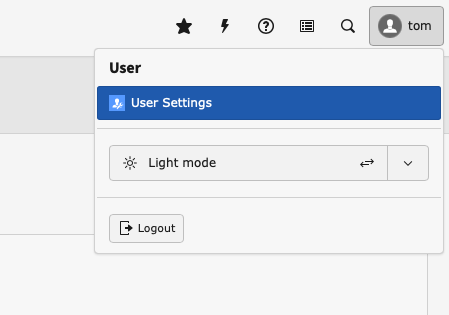
User Settings
By selecting the User icon at the very top right I can access the User Settings module. From here I can change my password as well change other information that's associated with my user account.

Configuring your TYPO3 installation
Head over to the Site Management module and select Sites.
Right now we have a single site configured (TYPO3 supports multiple sites in a single installation).
We can see that we have a domain assigned to our site and a default language set. If we need to make any changes, select the Pencil (edit) icon.

From the General tab I can set a website title and add an entry point (my domain). Underneath that we have Site Sets. We’ll take a closer look at them in Part 2.
In Part 2 ...
Part 2 is all about pages, themes and content. We will:
- Build out the Page Tree
- Install the bootstrap_package Extension to configure our sites look and feel
If you're new to TYPO3, head over to the TYPO3 Getting Started Guide.
You can also access a detailed installation guide for TYPO3, that includes information on how to install TYPO3 with and without Composer by the visiting the Official Installation Guide.
