
Feature Highlight: Manage and Edit Images Like a Pro in TYPO3

Whether you want to resize an image or add more gifs to your blog posts, TYPO3 has powerful and easy-to-use tools for editors.
When you’re working on a blog post or landing page, the last thing you want to do is juggle different apps and multiple tabs. With TYPO3 you don’t have to, because TYPO3 Core makes image tools available right out of the box (with some configuration), so you can:
- Upload images
- Edit, crop, and resize images
- Share image files across pages
- Improve SEO with image data
Here’s a quick rundown of the basics you need to know before working with images in TYPO3.
October 2024: TYPO3 v13 is out! See how image editing has received a major update, now allowing cropping of .svg images right out of the box.
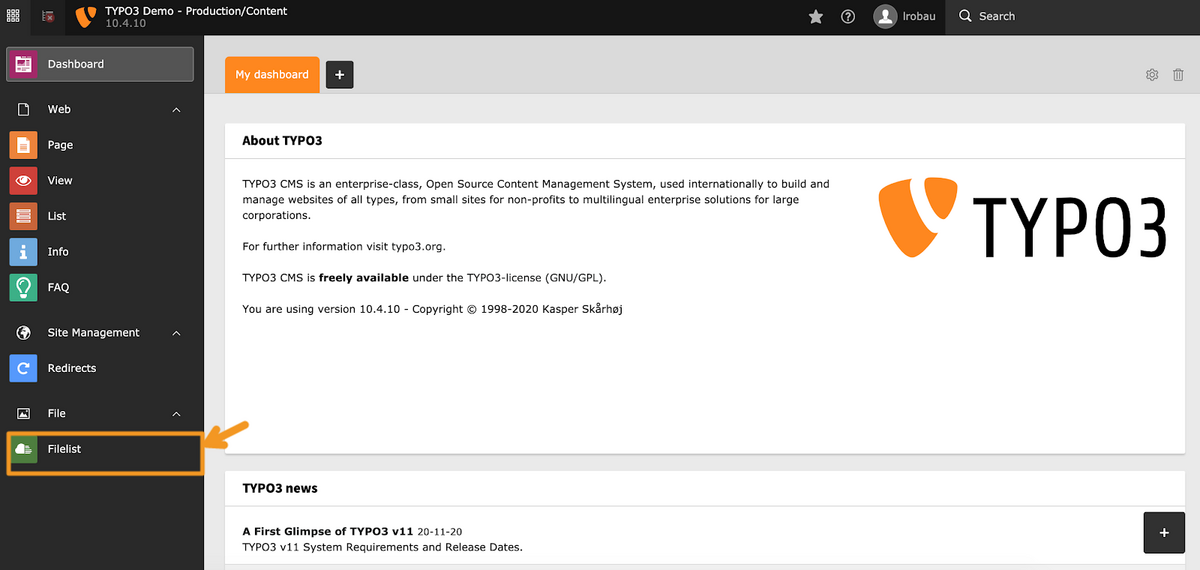
Your images and videos live in one place: Filelist
Any asset you upload will be added to the Filelist automatically. In TYPO3, you can find all the images you’ve ever uploaded in the Filelist, accessed via the Filelist icon in the left-hand menu of your TYPO3 backend.
You can organize your assets by creating folders with descriptive titles within the Filelist. You can also easily move one or multiple images from one folder to another. For instance, you might put all variations of your company logo in a folder called “Logos.”
How it makes your life easier: This structure will allow you to re-use the same image (e.g. your logo) on multiple pages, rather than uploading a new image per page. This lets you reuse your image’s metadata too, though you can override it on a page-by-page basis.
For in-depth information, see the File Module section of the Getting Started tutorial.

TYPO3 allows many types of images and media
When you’re working on a page and need to add or upload an image, you have three options for doing so:
- Add media file: Add an existing image from your Filelist.
- Select & upload files: Upload a new file from your computer (you can use your desktop’s file manager or drag and drop the image in).
- Add media by URL: If you’re using an image or video from the web, just insert the link.
All of the file extensions listed in green, are compatible with TYPO3.

Upload images ahead of time or as you build pages
Uploading an image (or multiple images at once) to Filelist is a good way to keep your assets organized, especially if you’ll be using a single image multiple times. Simply click on the upload button at the top of the Filelist page, or right-click on the folder where the image belongs.
If, on the other hand, you’re the kind of person who usually adds images or videos on the fly, you have two other options for uploading images.
Add images to a content element
A content element is a structured element that formats different building blocks—like headers, body text, and images. Adding images through a default content element, like “Text & Media” ensures that your images have consistent formatting across your website.
Here’s an example of how you’d add an image via a “Text & Media” element for a blog post.
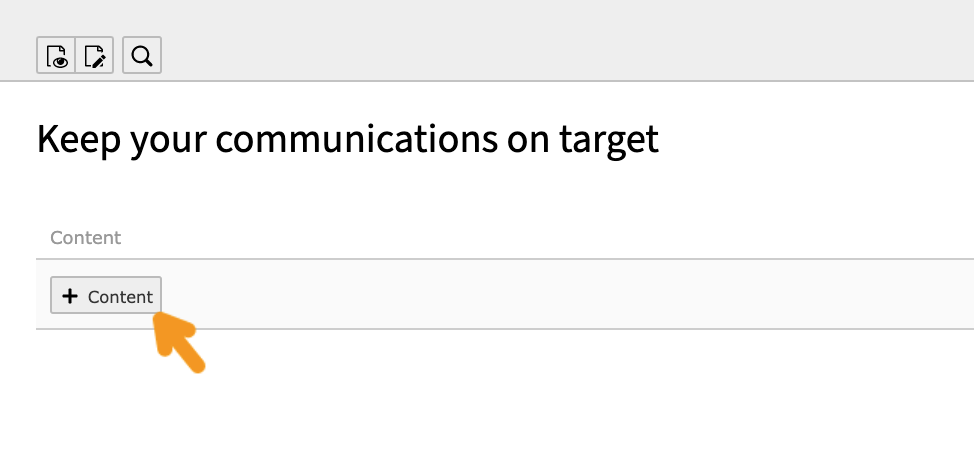
Step 1: Select the “Content” button to add a new content element to your page
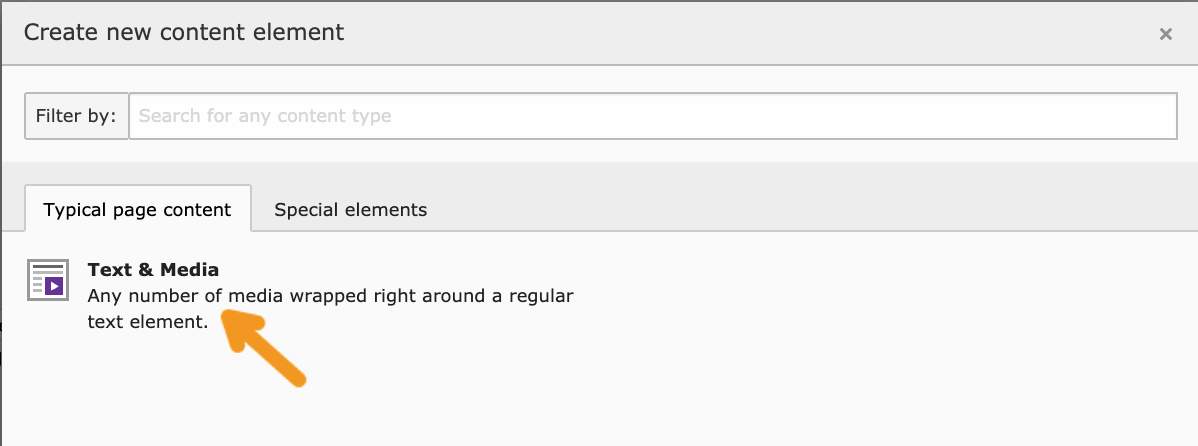
Step 2: Select a content element like “Text & Media” that allows you to add an image
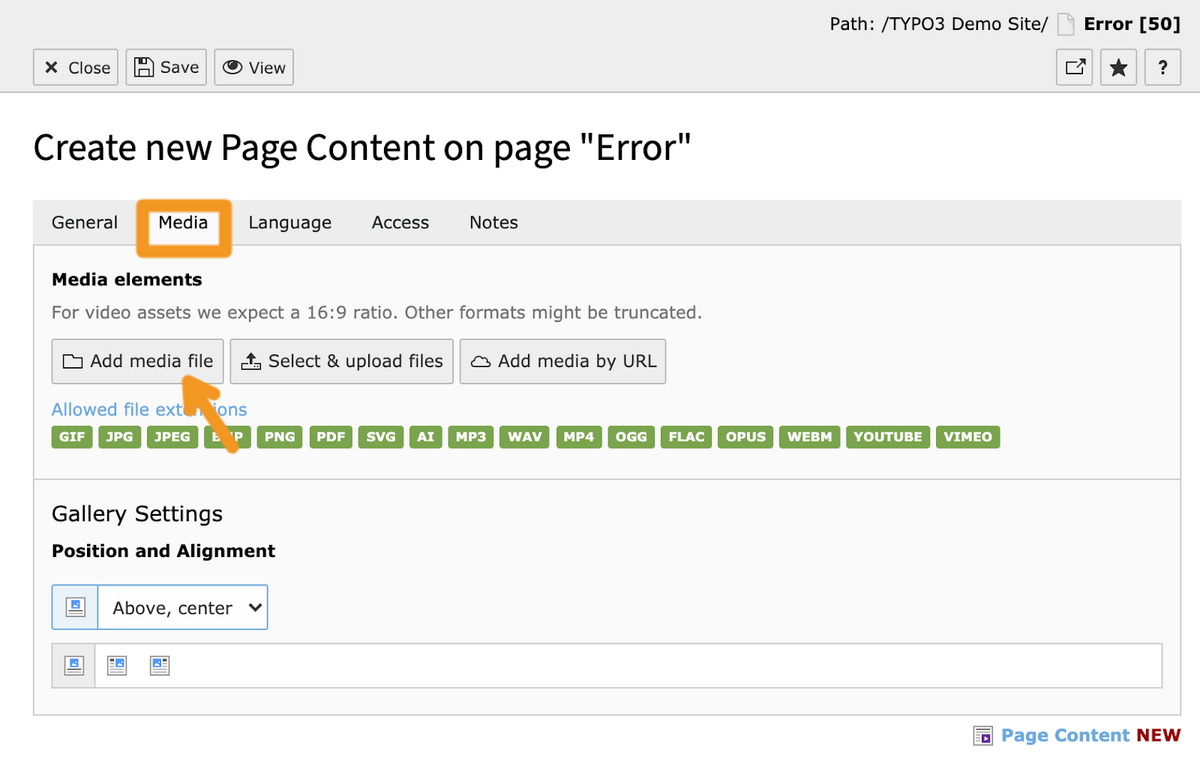
Step 3: Select the media tab, and upload an image by clicking “Add media file.” This will open a file selector popup
A quick tip: We recommend using the “Add media file” button, as opposed to the “Select & upload files” button because any media uploaded directly to the page will automatically be stored in a user_upload folder in the Filelist, separate from your existing file structure, and could make it hard to find files as your website grows.
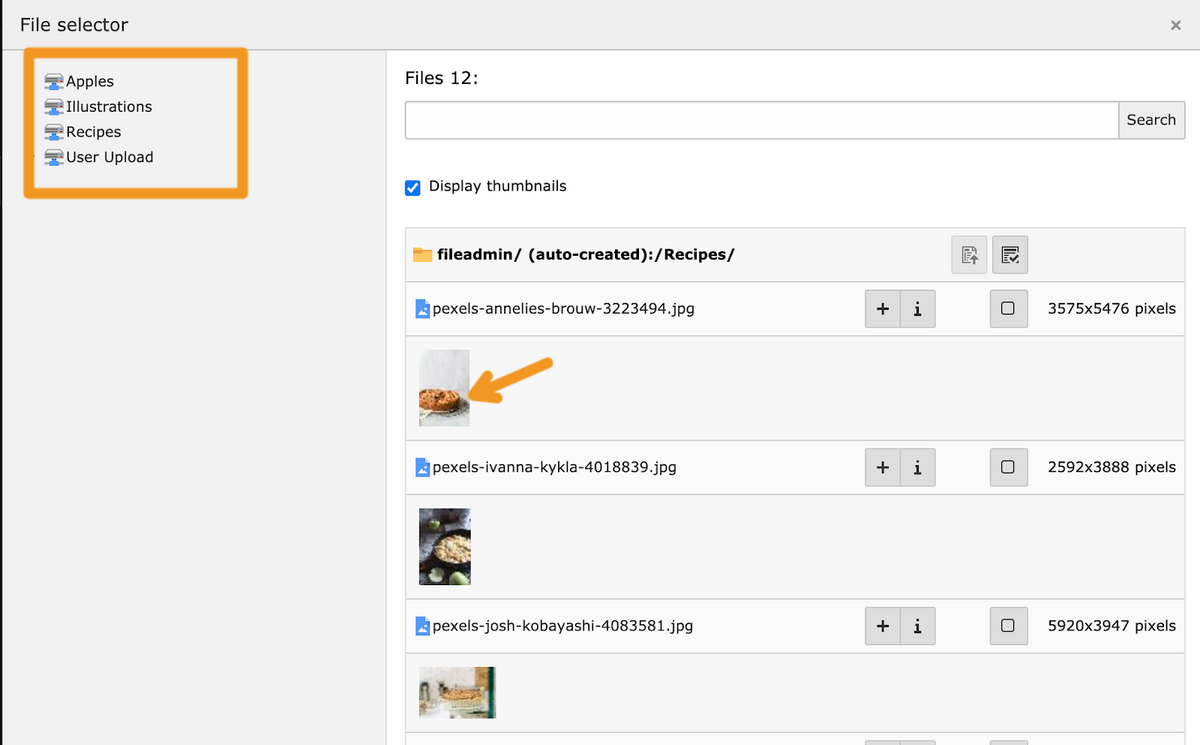
Step 4: Choose the file folder from which you’d like to select your image on the left-hand side of the popup window. You can select an existing image by clicking on it. Upload a new image to that folder by selecting the “Choose files” button at the bottom of the popup and clicking “Upload files.”
Add images via a rich text editor
You can also add images via a rich text editor, which is the kind of interface you’re probably used to using in Word, Pages, or Google Docs. If your TYPO3 setup includes the CKEditor extension and is configured so you can add images, you can click the “photo” icon to add an image. The downside of this method is that it’s harder to maintain consistent formatting across your website—for this reason, we recommend using content elements!
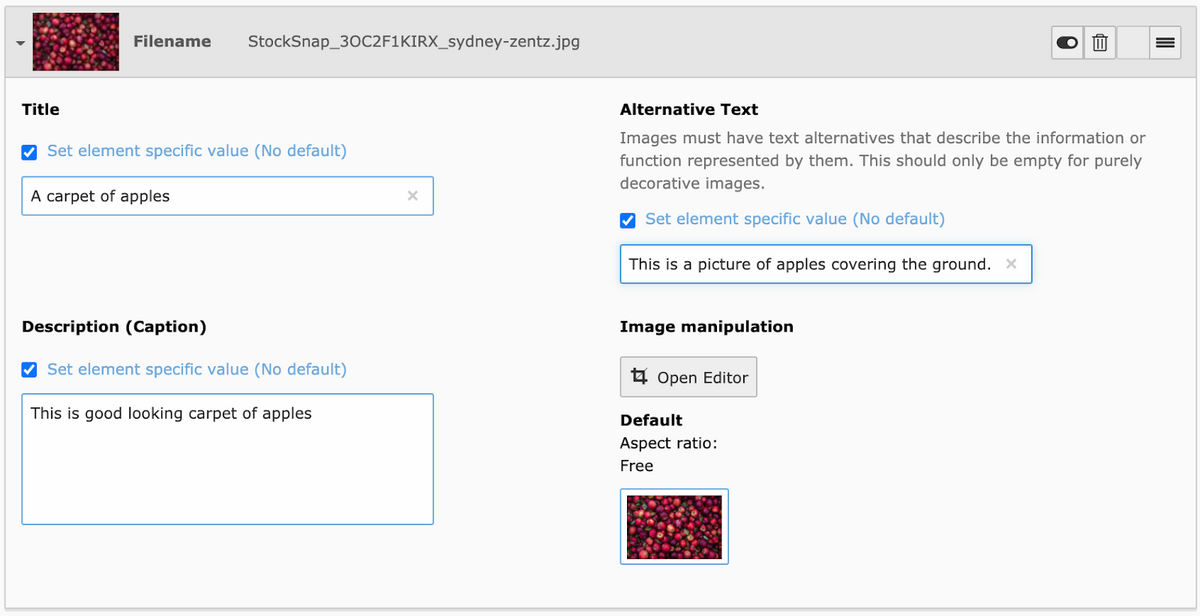
Set image metadata to improve SEO
TYPO3 allows you to set metadata for your images. Metadata like alternative text helps more of your content show up in search results because web crawlers can read the text.
The metadata includes:
- Title: The title of the image will show up as tooltip text when a user’s mouse hovers over the image.
- Description (caption): The text that goes under your image as a caption.
- Alternative Text: This accessibility feature describes the asset itself; if your image fails to load or if a user is visually-impaired, the Alt-Text describes the image.
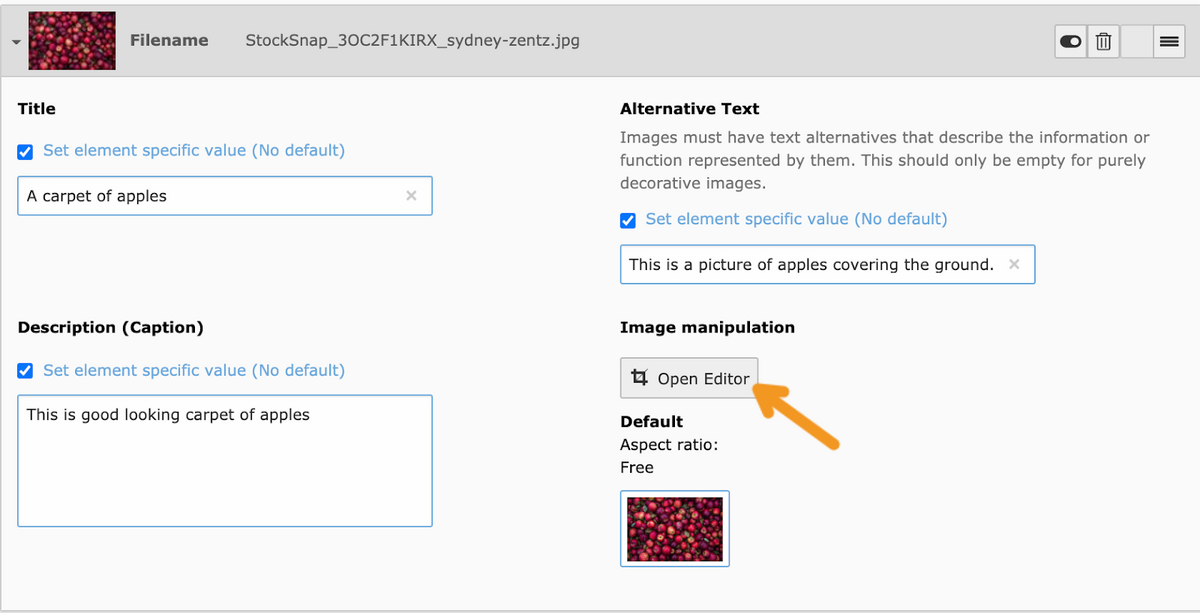
Edit and resize images
Let’s say you’ve added an image but need to cut out a rough edge or only show part of it. If you open the image editor, you can crop the file to the size you want.
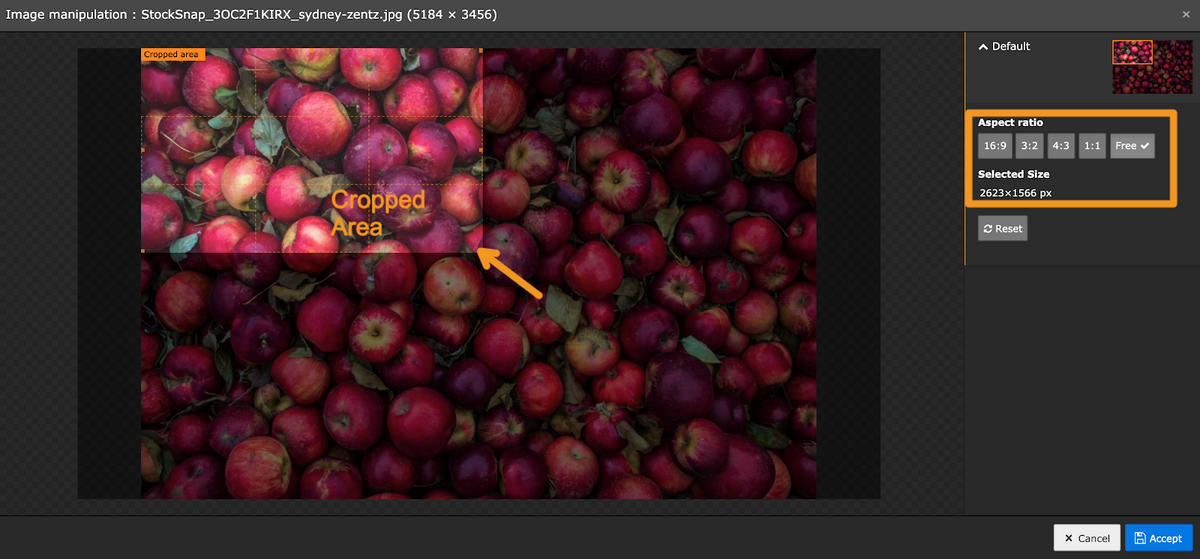
Whatever size you want for the cropped area there are shortcuts to adjust the aspect ratio, so that you’re sure your images are fitted to any screen size. The aspect ratios available are:
- 16:9
- 4:3
- 3:2
- 1:1
- Free

Set image sizes for different device sizes and breakpoints
To make images responsive, TYPO3 allows you to configure breakpoints and aspect ratios for every device size, from desktop to mobile.
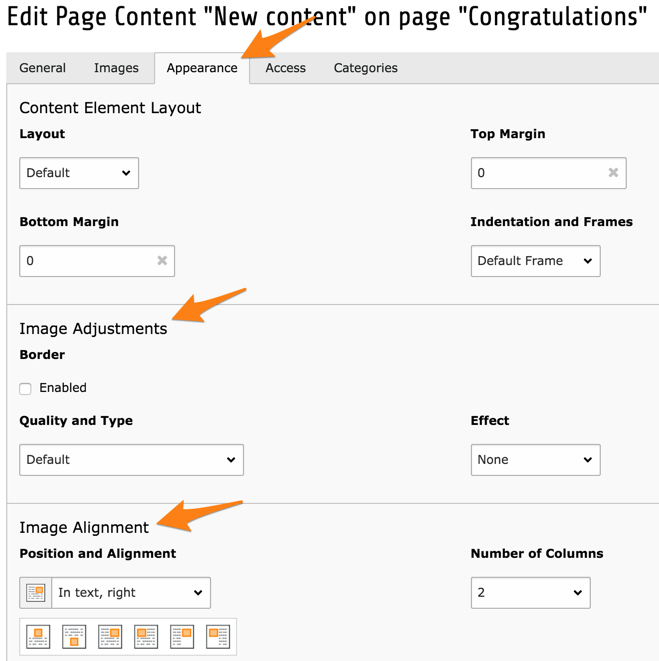
Edit the appearance of images
When you click on the “Appearance” tab of a content element, you can edit that image’s appearance by adding borders, color effects, and margins.
Get started with image editing in TYPO3
Now that you’ve seen the basics, we hope you have a sense of how powerful the TYPO3 CMS is when it comes to uploading and editing images. If you’re looking for more information on editing images in TYPO3, we have some other helpful tutorials. To exchange knowledge, ideas, and advice, join a vibrant community of TYPO3 users by registering for My TYPO3 today.
